

What if that “simple” weekend project under the kitchen sink ends up costing you more in water damage repairs and code violations than the unit itself? It’s a common worry for homeowners from Stuart to Port St. Lucie who want the convenience of a modern kitchen without the headache of a DIY disaster. Most people agree that an insinkerator garbage disposal installation seems straightforward until they’re staring at a tangle of wires or a leaking sink flange. You want a quiet, leak-free solution that stands up to heavy use, but the fear of a botched electrical connection or violating Florida plumbing codes can be paralyzing.
This 2026 guide is designed to give you total confidence in your kitchen upgrade. You’ll learn the step-by-step process of mounting your new unit properly while discovering the specific technical requirements for Treasure Coast homes. We’ll walk through the essential tools you need, explain the nuances of the Florida Building Code, and help you identify the exact moment when leaning on a professional’s expertise is the smartest move for your home’s long-term safety and comfort.
Key Takeaways
- Learn how to prepare for a smooth project by selecting the right tools and understanding InSinkErator’s noise reduction and grinding technologies.
- Follow our clear walkthrough for a leak-proof Insinkerator garbage disposal installation, focusing on the essential steps for a perfect sink flange seal.
- Evaluate your local plumbing system’s condition to prevent common DIY mishaps like vibration damage to aging pipes or corroded metal lines.
- Gain peace of mind by understanding the electrical requirements and Florida codes necessary for a safe, long-lasting kitchen upgrade.
- Recognize the key indicators that suggest you should call a local expert to avoid costly water damage or complex wiring issues.
Preparing for Your InSinkErator Installation: Tools and Tech
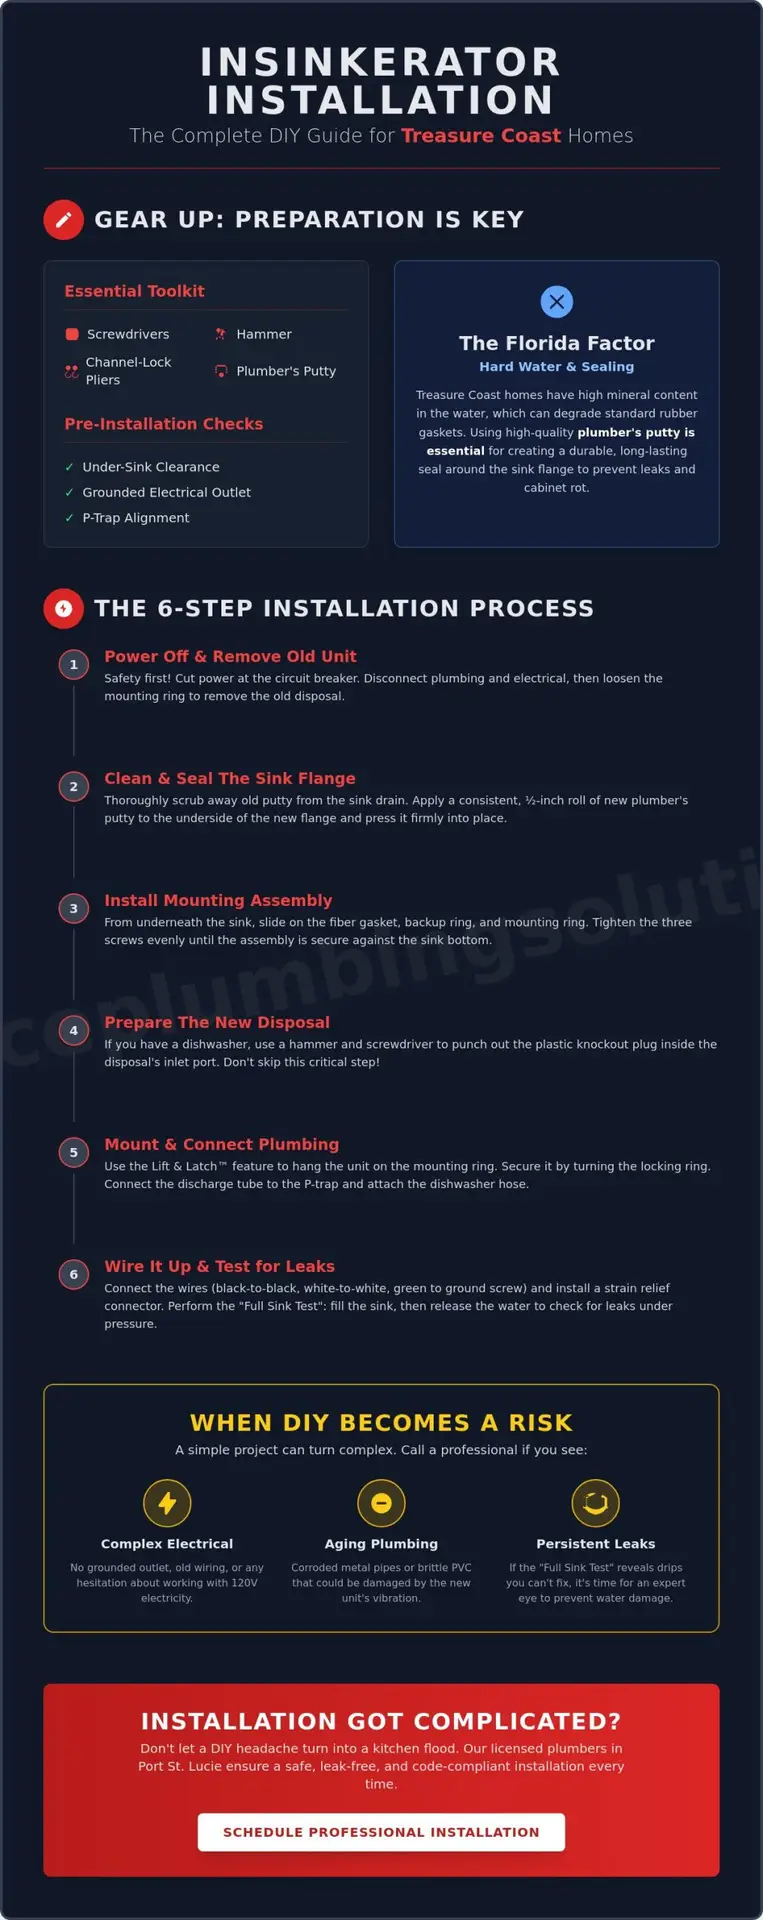
Success in any home improvement project begins with the right preparation. For a professional-grade insinkerator garbage disposal installation, having your tools laid out prevents mid-project frustration. You’ll need a flat-head and Phillips screwdriver, channel-lock pliers, a hammer, and a fresh container of plumbers putty. Beyond the toolbox, check that your under-sink cabinet has enough clearance for the specific model you’ve chosen; some high-performance units are significantly larger than budget models. Ensure there is a grounded electrical outlet nearby. Before you start, verify that your electrical setup meets current Port St. Lucie building codes to ensure a safe and legal installation.
The Florida Factor: Hard Water and Sealing
Homeowners in the Treasure Coast, from Fort Pierce to Stuart, deal with high mineral content in their water. This hard water can be tough on a garbage disposal unit, often causing standard rubber gaskets to become brittle and fail prematurely. Using a high-quality plumbers putty is non-negotiable for creating a lasting seal around the sink flange. Always take the time to scrub the sink drain area until it’s spotless. Any leftover residue or old putty will prevent a watertight bond and lead to slow drips that rot your cabinetry.
InSinkErator Technology Overview
Modern InSinkErator models are packed with features like SoundSeal® for quiet operation and MultiGrind® for handling tough food scraps. One of the best innovations for DIYers is the Lift and Latch™ mounting system. It simplifies the insinkerator garbage disposal installation by holding the unit in place while you secure the locking ring. Before finalizing the mount, do a quick compatibility check. Verify that your existing P-trap aligns with the new discharge tube to avoid a trip to the hardware store for extra PVC fittings.
Step-by-Step: How to Install an InSinkErator Garbage Disposal
Ready to get your hands dirty? Start by cutting the power at the circuit breaker. Safety is the first priority for any insinkerator garbage disposal installation. Use a screwdriver to loosen the existing mounting ring and drop the old unit. Once it’s out, clear away all old putty and debris from the sink hole. Apply a consistent, half-inch bead of plumbers putty to the underside of the new sink flange. Press the flange firmly into the drain opening. From underneath the sink, slide the fiber gasket, backup ring, and mounting ring onto the flange. Tighten the three mounting screws evenly until the assembly is rock solid against the sink bottom.
Before mounting the actual disposal, address the dishwasher connection. If you have a dishwasher, use a hammer and a flat-head screwdriver to punch out the plastic knockout plug inside the disposal’s inlet. This is a critical step that many homeowners overlook, resulting in a dishwasher that won’t drain. After the plug is removed, align the unit with the mounting tracks. Use the Lift and Latch™ feature to click the unit into place. For specific torque requirements on your model, consult InSinkErator’s official installation guide to ensure a secure fit.
Wiring and Electrical Connections
Remove the metal plate at the bottom of the disposal to access the wiring. Connect the wires; black to black and white to white, then secure the green ground wire to the grounding screw. Always install a strain relief connector where the cord enters the unit. This small component prevents the wires from rubbing against the metal housing or pulling loose over time. If you feel any hesitation about working with 120V electricity, don’t take the risk. It’s much safer to have a professional handle the final hookup.
Testing for Leaks and Vibration
Verify your work with the “Full Sink Test.” Plug the drain, fill the sink to the brim, and then pull the stopper. The sudden weight and volume of water create high pressure that reveals even the smallest gaps in your seals. Listen for unusual grinding or excessive vibration while the motor runs. If you notice persistent drips or the unit seems unstable, we offer reliable plumbing repairs to help you cross the finish line without the stress of a flooded cabinet.
When DIY Becomes a Risk: Professional Installation in PSL
While a DIY garbage disposal installation is a common goal for many handy homeowners, the reality of Florida’s coastal plumbing can complicate things. In older neighborhoods across Fort Pierce and Stuart, we often encounter corroded cast iron pipes or brittle PVC that shouldn’t be disturbed by an amateur. A new InSinkErator is a powerful machine. If your drainage lines in Jensen Beach are already weakened by age, the vibration damage from a high-torque motor can turn a tiny hairline crack into a major flood under your sink. Choosing a professional for your insinkerator garbage disposal installation also ensures your manufacturer warranty remains fully intact. First Choice Plus Plumbing & Air provides precision garbage disposal installation throughout the Treasure Coast to keep your kitchen running smoothly.
Local Service Distinctions
We pride ourselves on being a local pillar for residential maintenance. Our main office in Port St. Lucie is a total solution provider; we handle both expert plumbing and comprehensive AC repairs for families in St. Lucie West and Tradition. If you’re located near our Land O’ Lake branch, please note that this team focuses exclusively on plumbing excellence and does not offer air conditioning services. We regularly support our neighbors with on-time, honest service across the entire region.
The Advantage of a Professional Plumbing Inspection
A simple disposal swap is the perfect time for a health checkup of your kitchen’s drainage. When we perform an insinkerator garbage disposal installation in Palm City, we inspect the entire P-trap assembly and the wall connection for signs of slow leaks or mineral buildup. This preventative approach saves you from emergency calls later. You gain the peace of mind that comes with 24/7 emergency support and a system that meets every local code. For more tips on protecting your home, see our guide on choosing a reliable plumber to ensure your maintenance is always in expert hands.
Enjoy a High-Performance Kitchen with Confidence
Upgrading your kitchen with a modern disposal shouldn’t be a source of stress. By carefully preparing your workspace and following the technical steps for a proper insinkerator garbage disposal installation, you can ensure your sink remains leak-free and your plumbing stays protected from vibration damage. Remember that the small details, like removing the dishwasher knockout plug and applying a perfect bead of putty, make the difference between a successful project and a messy repair. If you encounter aging pipes or complex wiring that feels beyond your comfort zone, you don’t have to tackle it alone.
Since 2007, First Choice Plus Plumbing & Air has helped neighbors throughout the Treasure Coast resolve their plumbing challenges with calm competence. Our highly trained, background-checked technicians are ready to handle the heavy lifting for you. Whether you need a routine swap or 24/7 emergency service for a sudden leak, we are here to provide the steady hand you need. Get Expert InSinkErator Installation in Port St. Lucie Today and get back to enjoying your home without the worry of hidden plumbing issues. Your kitchen is the heart of your home, and we’re here to keep it beating strong.
Frequently Asked Questions
Do I need to buy a new power cord for my InSinkErator installation?
Most InSinkErator models are sold without a pre-installed power cord. You’ll either need to buy a separate power cord kit or hardwire the unit directly into your home’s electrical system. If you’re performing a replacement insinkerator garbage disposal installation, you can often reuse the cord from your old unit if the insulation is intact. Always inspect the wires for cracks or fraying before making the final connection.
What happens if I forget to remove the dishwasher knockout plug?
Forgetting the knockout plug causes your dishwasher to back up because the wastewater has no way to enter the disposal. You’ll notice a pool of dirty water at the bottom of your dishwasher after a cycle. To fix this, you must remove the dishwasher drain hose and punch the plastic plug through into the grinding chamber. Make sure to retrieve the loose plastic piece so it doesn’t jam the impellers.
Can I install an InSinkErator if I have a septic tank in Fort Pierce?
You can certainly use a disposal with a septic system in Fort Pierce, but we recommend models like the Evolution Septic Assist. These specific units use an enzyme treatment to help break down food particles more efficiently. Keep in mind that adding food waste to your septic tank increases the accumulation of solids. It is a good idea to schedule regular plumbing inspections to ensure your system handles the extra load without issues.
How long does a professional garbage disposal installation take?
A professional insinkerator garbage disposal installation usually takes about 60 to 90 minutes. This includes removing the old unit, sealing the new flange, and testing the connections for leaks. If your Treasure Coast home has older plumbing that requires modifications or if we need to update your electrical outlet to meet current safety codes, the process may take slightly longer to ensure a high-quality, lasting result.

Article by
Written by First Choice Plus Plumbing & Air Team
This article was created by the team at First Choice Plumbing Solutions, a licensed and experienced plumbing and HVAC company serving Port St. Lucie, Land O’ Lakes, and surrounding areas.
Our team specializes in plumbing and air conditioning services, including drain cleaning, leak detection, water heater repair and installation, AC repair, maintenance, and system installations. Our content is based on real-world experience and the common issues we solve for homeowners and businesses every day.
We aim to provide accurate, helpful, and easy-to-understand information so you can make informed decisions about your plumbing and HVAC needs.
If you need reliable, professional service, First Choice Plumbing Solutions is here to help.
Disclaimer
Disclaimer: The information provided in this article is for general informational purposes only and does not constitute professional plumbing or HVAC advice. Every situation is different, and readers should consult a licensed professional for proper diagnosis and repair. First Choice Plus Plumbing & Air is not liable for any damages or losses resulting from the use of this information.