
Table of Contents
- Identifying the Cause of Your Running Toilet
- Tools and Supplies You’ll Need for the Job
- Removing the Toilet Tank Lid Safely
- Inspecting the Flapper Valve and Seal
- Adjusting Toilet Float Height to Prevent Overflow
- Checking the Fill Valve and Refill Tube
- Toilet Flapper Replacement: When and How
- Signs of a Leaking Toilet and Water Waste Impact
Last Updated: August 7, 2026
How to Fix a Running Toilet: Step-by-Step Guide
A running toilet wastes water constantly and drives up your water bill. Most running toilet problems are fixable without calling a plumber. At First Choice Plus Plumbing & Air, we’ve helped countless homeowners in Port St. Lucie and the Treasure Coast diagnose and repair running toilets themselves. This guide walks you through identifying the cause, gathering the right tools, and executing repairs that work.
The most common culprits are a worn flapper valve, a misadjusted float, or a faulty fill valve. Each requires a different fix, but all are within reach for a homeowner willing to spend an hour on the job.
Identifying the Cause of Your Running Toilet
A running toilet isn’t always obvious. Sometimes it’s a constant trickle; other times it’s an intermittent refill cycle. The first step is figuring out what’s actually wrong.
Check for a silent leak
The most insidious problem is a silent leak, water trickling from the tank into the bowl without any sound. Add a few drops of food coloring to the tank (not the bowl). Wait 15 minutes without flushing. If the color appears in the bowl, water is leaking from the tank. This almost always means the flapper valve is worn or warped.
Listen for the refill cycle
A normal toilet refills for a few seconds after you flush. If your toilet refills every few minutes without being flushed, something is wrong. Frequent refill cycles usually mean either the float is set too high or the fill valve itself is failing and won’t shut off properly.
Sit quietly near the toilet for a few minutes and observe the pattern. A toilet that refills more than once every 10 minutes without being used is definitely wasting water.
Tools and Supplies You’ll Need for the Job
Before you remove the tank lid, gather everything you’ll need.
Essential tools:
- Adjustable wrench or pliers
- Flathead screwdriver
- Bucket or towels
- New flapper valve (universal fit)
- New fill valve gasket (optional)
Most of these items cost very little and are available at any hardware store. A universal flapper valve works on nearly all toilets made in the last 20 years. If your toilet is older, bring a photo of the tank interior to the store and staff can help you find the right fit.
Removing the Toilet Tank Lid Safely
The tank lid is heavy and fragile. Handle it with care to avoid a costly replacement.
Turn off the water supply first. Look for a small valve behind or beside the toilet where the water line enters. Turn it clockwise until it stops. Flush the toilet to empty the tank. Lift the lid straight up and set it gently on a towel on the floor, never on hard tile.
Once the lid is off, you’ll see the flapper at the bottom of the tank, the float mechanism, the fill valve on the side, and the overflow tube in the center. These are the main components you’ll be working with.
Inspecting the Flapper Valve and Seal
The flapper is a rubber disc that sits at the bottom of the tank and controls the flow of water into the bowl. When you flush, the chain pulls the flapper up, releasing water. When the tank empties, the flapper falls back down and seals the opening. If the seal is broken, water leaks constantly.
How to spot a worn flapper
Look at the flapper closely. Is it discolored, cracked, or warped? Does it sit flat against the flush valve seat, or is there a visible gap? A flapper that doesn’t seal completely is the problem.
Gently push the flapper with your finger. It should move freely and then settle flat. If it sticks, wobbles, or feels brittle, it’s time to replace it. Mineral deposits and age harden rubber flappers, especially in areas with hard water.
Check the flush valve seat itself. Is it corroded, pitted, or rough? If the seat is damaged, a new flapper won’t seal properly. A roughened seat can sometimes be cleaned with a soft cloth and vinegar, but severe corrosion usually means professional replacement is needed.
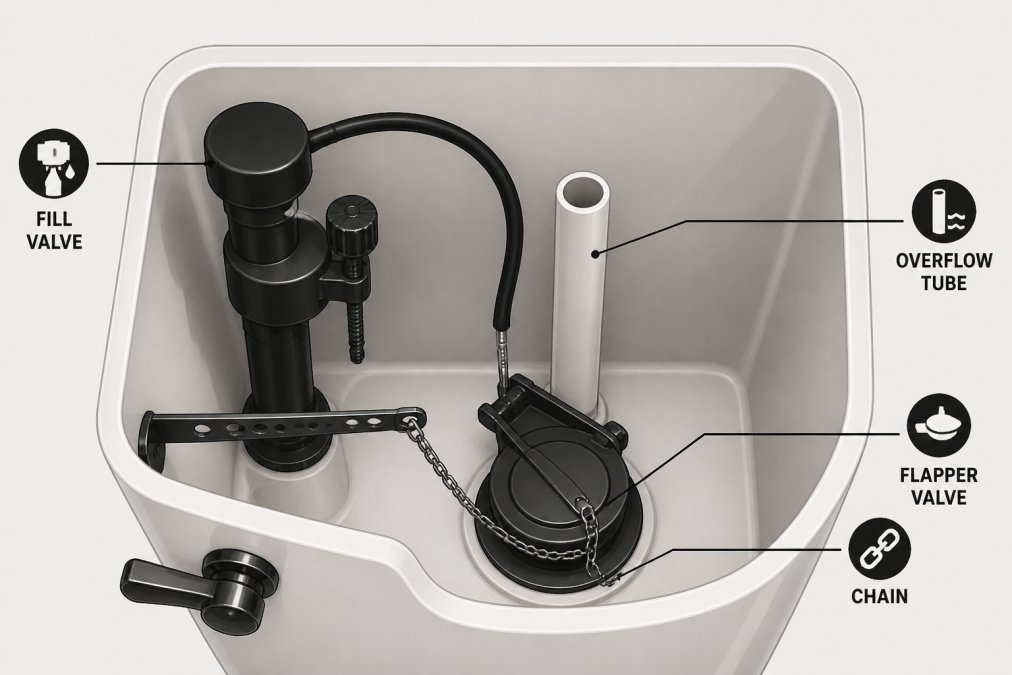
The chain connecting the flush handle to the flapper should have about a half-inch of slack when the flapper is at rest. Too much slack and the flapper won’t lift fully when you flush. Too little slack and the flapper won’t seal completely. Adjust the chain by moving the hook to a different link if needed.
Adjusting Toilet Float Height to Prevent Overflow
The float controls when the fill valve shuts off. If it’s set too high, the tank overfills and water spills into the overflow tube. If it’s set too low, the tank doesn’t fill enough and weak flushes result.
Most modern toilets have either a ball float or a cylinder float. Both work on the same principle: as the water level rises, the float rises with it. When the float reaches a certain height, it triggers the fill valve to close.
Ball float vs. cylinder float adjustment
A ball float is a hollow ball attached to a rod or arm. To lower the water level, bend the arm downward slightly. To raise it, bend the arm upward. Make small adjustments (a quarter-inch at a time) and test after each change by flushing and watching the water level.
A cylinder float slides up and down a vertical rod. A small clip or clamp on the rod controls its position. Loosen the clip, slide the float down to lower the water level, and tighten the clip. This design is easier to adjust than a ball float.
The correct water level is about one inch below the top of the overflow tube. This ensures the tank fills properly without overfilling. If water is currently running into the overflow tube constantly, the float is set too high, lower it immediately to stop the waste.
Checking the Fill Valve and Refill Tube
The fill valve controls water flow into the tank. When it fails, the tank either won’t fill or won’t stop filling. A faulty fill valve is harder to repair than a flapper, and replacement is often the best option.
Listen to the fill valve as the tank refills. A hissing or whistling sound suggests sediment or mineral buildup inside. A continuous trickle that never stops suggests the valve seal is worn. If the valve is old and corroded, cleaning it might buy you time, but replacement is more reliable.
The refill tube is a small plastic tube that directs water into the overflow tube during the refill cycle. If the refill tube is cracked, kinked, or disconnected, the bowl seal dries out. Check that it’s properly seated and not damaged.
To test the fill valve, turn off the water supply and flush the toilet to empty the tank. Turn the water back on and listen. The tank should fill in about 30 seconds and then stop. If it fills but doesn’t stop, or if it fills very slowly, the fill valve needs attention.
Toilet Flapper Replacement: When and How
If the flapper is cracked, warped, or doesn’t seal properly, replacement is the right move. A new flapper takes about 10 minutes to install.
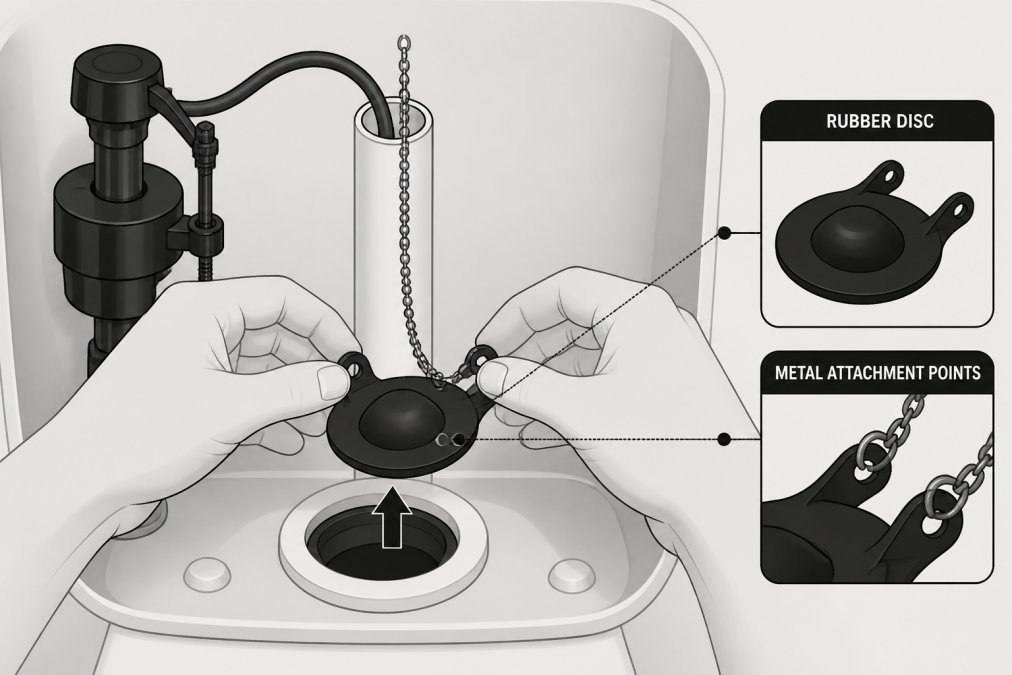
Turn off the water supply and flush to empty the tank completely. Remove the chain from the old flapper by unclipping or unhooking it. Most flappers are held in place by two small ears that fit into slots on the flush valve seat. Lift the flapper straight up and remove it.
Before installing the new flapper, clean the flush valve seat with a soft cloth. Remove any mineral deposits, sediment, or debris. A clean seat ensures a good seal. If the seat is pitted or corroded, wipe it as clean as you can, but know that a damaged seat may still leak even with a new flapper.
Insert the new flapper’s ears into the slots on the flush valve seat. It should sit flat and centered. Attach the chain to the flapper arm, leaving about a half-inch of slack. Test by flushing; the flapper should lift smoothly and then fall back into place with a solid seal.
Universal vs. proprietary flapper parts
Most modern toilets use universal flappers that fit many tanks. However, some older or specialty toilets may require a proprietary flapper made specifically for that model.
Before buying, check the tank manufacturer name stamped on the inside. Bring a photo of the flapper seat to the hardware store, or bring the old flapper with you. Staff can confirm whether a universal fit will work or if you need a specific part.
Universal flappers are a safe bet for most homes. They’re durable and work reliably. If you’re unsure, a universal flapper is a low-risk first attempt.
Signs of a Leaking Toilet and Water Waste Impact
A leaking toilet is silent waste of water and money. Many homeowners don’t realize how much water is being wasted because the leak is hidden inside the tank.
Common signs of a leak include a hissing sound from the tank, water trickling into the bowl without flushing, or a toilet that refills frequently when no one is using it. The dye test described earlier is the most reliable way to confirm a leak.
How a running toilet affects your water bill
A small leak adds up fast. A toilet that leaks just one gallon per hour wastes 24 gallons per day. Over a month, that’s 720 gallons of wasted water. Over a year, it’s nearly 8,800 gallons.
Most municipal water systems charge by the gallon. Even at modest rates, that volume of wasted water costs money every single month the leak continues. Beyond the financial impact, wasted water strains local water supplies and increases the environmental footprint of your home.
The good news is that fixing a running toilet stops the waste immediately. A repair that takes an hour can save thousands of gallons over the life of the toilet.
A running toilet doesn’t have to drain your wallet or your patience. Most repairs are straightforward and require only basic tools and a little patience. If you’ve worked through the steps above and the problem persists, or if you discover corrosion, sediment buildup, or damage beyond simple flapper replacement, we’re here to help. First Choice Plus Plumbing & Air has served the Treasure Coast with transparent upfront pricing and honest recommendations. Our Plumbing Services team will evaluate your toilet, explain what’s wrong, and fix it right. Emergency and after-hours service may be available, subject to location, the type of problem, and technician availability. Call us today to schedule a service visit and get your toilet running smoothly again.
Frequently Asked Questions
What is the most common cause of a constantly running toilet?
A worn or misaligned flapper valve is the leading cause of a running toilet. The flapper sits at the bottom of the tank and seals the flush valve opening. When the rubber gasket deteriorates or sediment prevents a tight seal, water continuously leaks into the bowl, triggering the fill valve to refill the tank. This creates the constant running sound and wastes significant water over time.
How do I know if my toilet has a silent leak?
A silent leak occurs when water seeps from the tank into the bowl without you hearing the refill cycle. To test for this, add food coloring or a dye tablet to the tank and wait 15 minutes without flushing. If color appears in the bowl, you have a leak. This is often caused by a deteriorated flapper or fill valve gasket and should be addressed promptly to prevent water waste.
Can I fix a running toilet myself, or do I need a plumber?
Many running toilet issues can be fixed by homeowners with basic tools and patience. Adjusting the float, cleaning sediment from the fill valve, or replacing a flapper are manageable DIY tasks. However, if the problem persists after these steps, or if you’re uncomfortable working inside the tank, a professional plumber can diagnose and repair the issue quickly. First Choice Plus Plumbing & Air has served Port St. Lucie and the Treasure Coast since 2007 and can evaluate your specific situation.
How much water does a running toilet waste?
A continuously running toilet can waste 200 gallons or more per day, depending on the severity of the leak. Over a month, this translates to thousands of gallons and a noticeable increase in your water bill. Even a minor leak that refills the tank once per hour adds up quickly. Fixing the problem promptly protects both your water usage and your budget.
This article was written using GrandRanker